Hardware (Only)
Go Kart!
You know what's fun? A Go Kart. In my second semster senior year, I had just Gen Eds to complete. I had free time, and I was bored. I wanted to do something that would require some amout of engineering and fabrication, but would be fun. So, me and two other guys built a Go Kart out of a three wheeled mobility scooter.

Go Kart!
HHKB
I was unable to find a guide to dissassembling my Happy Hacking Keyboard Lite 2 for cleaning, so I wrote up how I did it.
Hardware (and Software)
Fenrir
Fenrir was the first project I headed at the robotics lab. I did not design the robot, it was built before I came to IIT. I rebuilt it to better compete in competition and rewrote it's control software. A friend on the team built an awesome robotic arm to mount on Fenrir that was controlled by an exoskeleton around his own arm. The controls changes and the robotic arm led Fenrir to his best finish in the history of the club, but his diwheel platform remains difficult to effectively control and maneuver.
The robot was rebuilt in my senior year, with a detailed writeup.
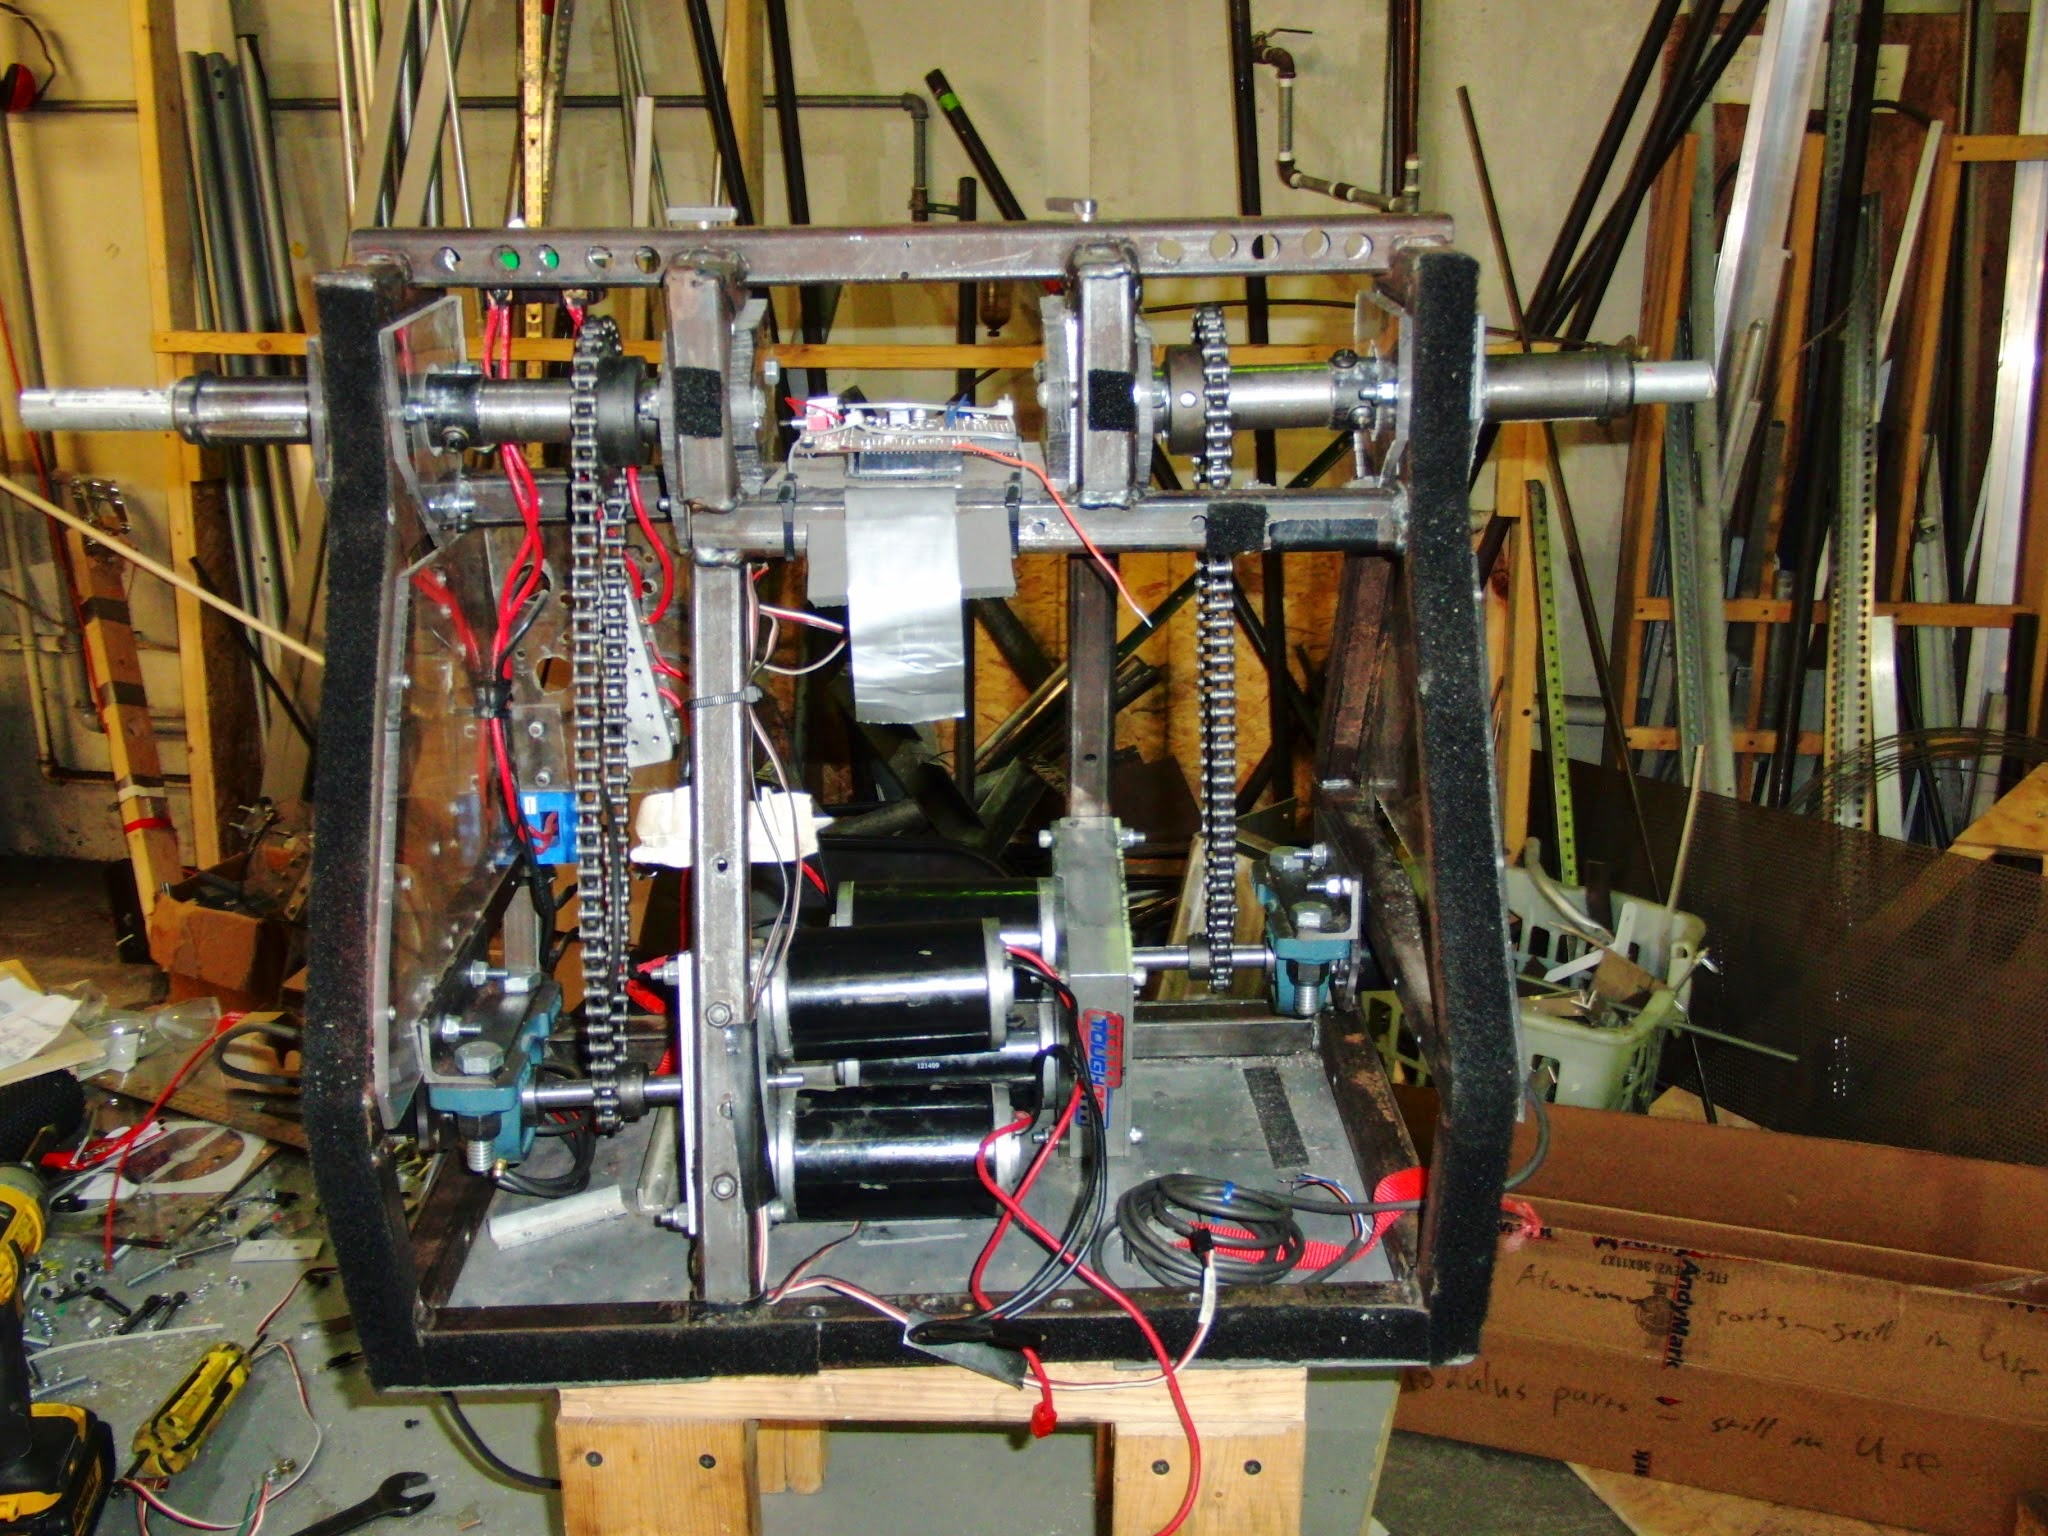
A Wheelless Fenrir
Goliath
The second robot I worked on with ITR is Goliath, which is written up well at the ITR projects page. During Jerry Sanders Creative Design Competition (JSDC) 2014, this robot won a demolition competition. During the competition the only damage was one of the motor controller cables unplugging. After plugging back in the wire, we drove the robot off the field of demolished robots.

Goliath, in demolition mode

Our Demolition Round win plaque
Snapchat doesn't have imagemagick
Goliath again won the demolition round in 2015, with more armor and less damage to itself.
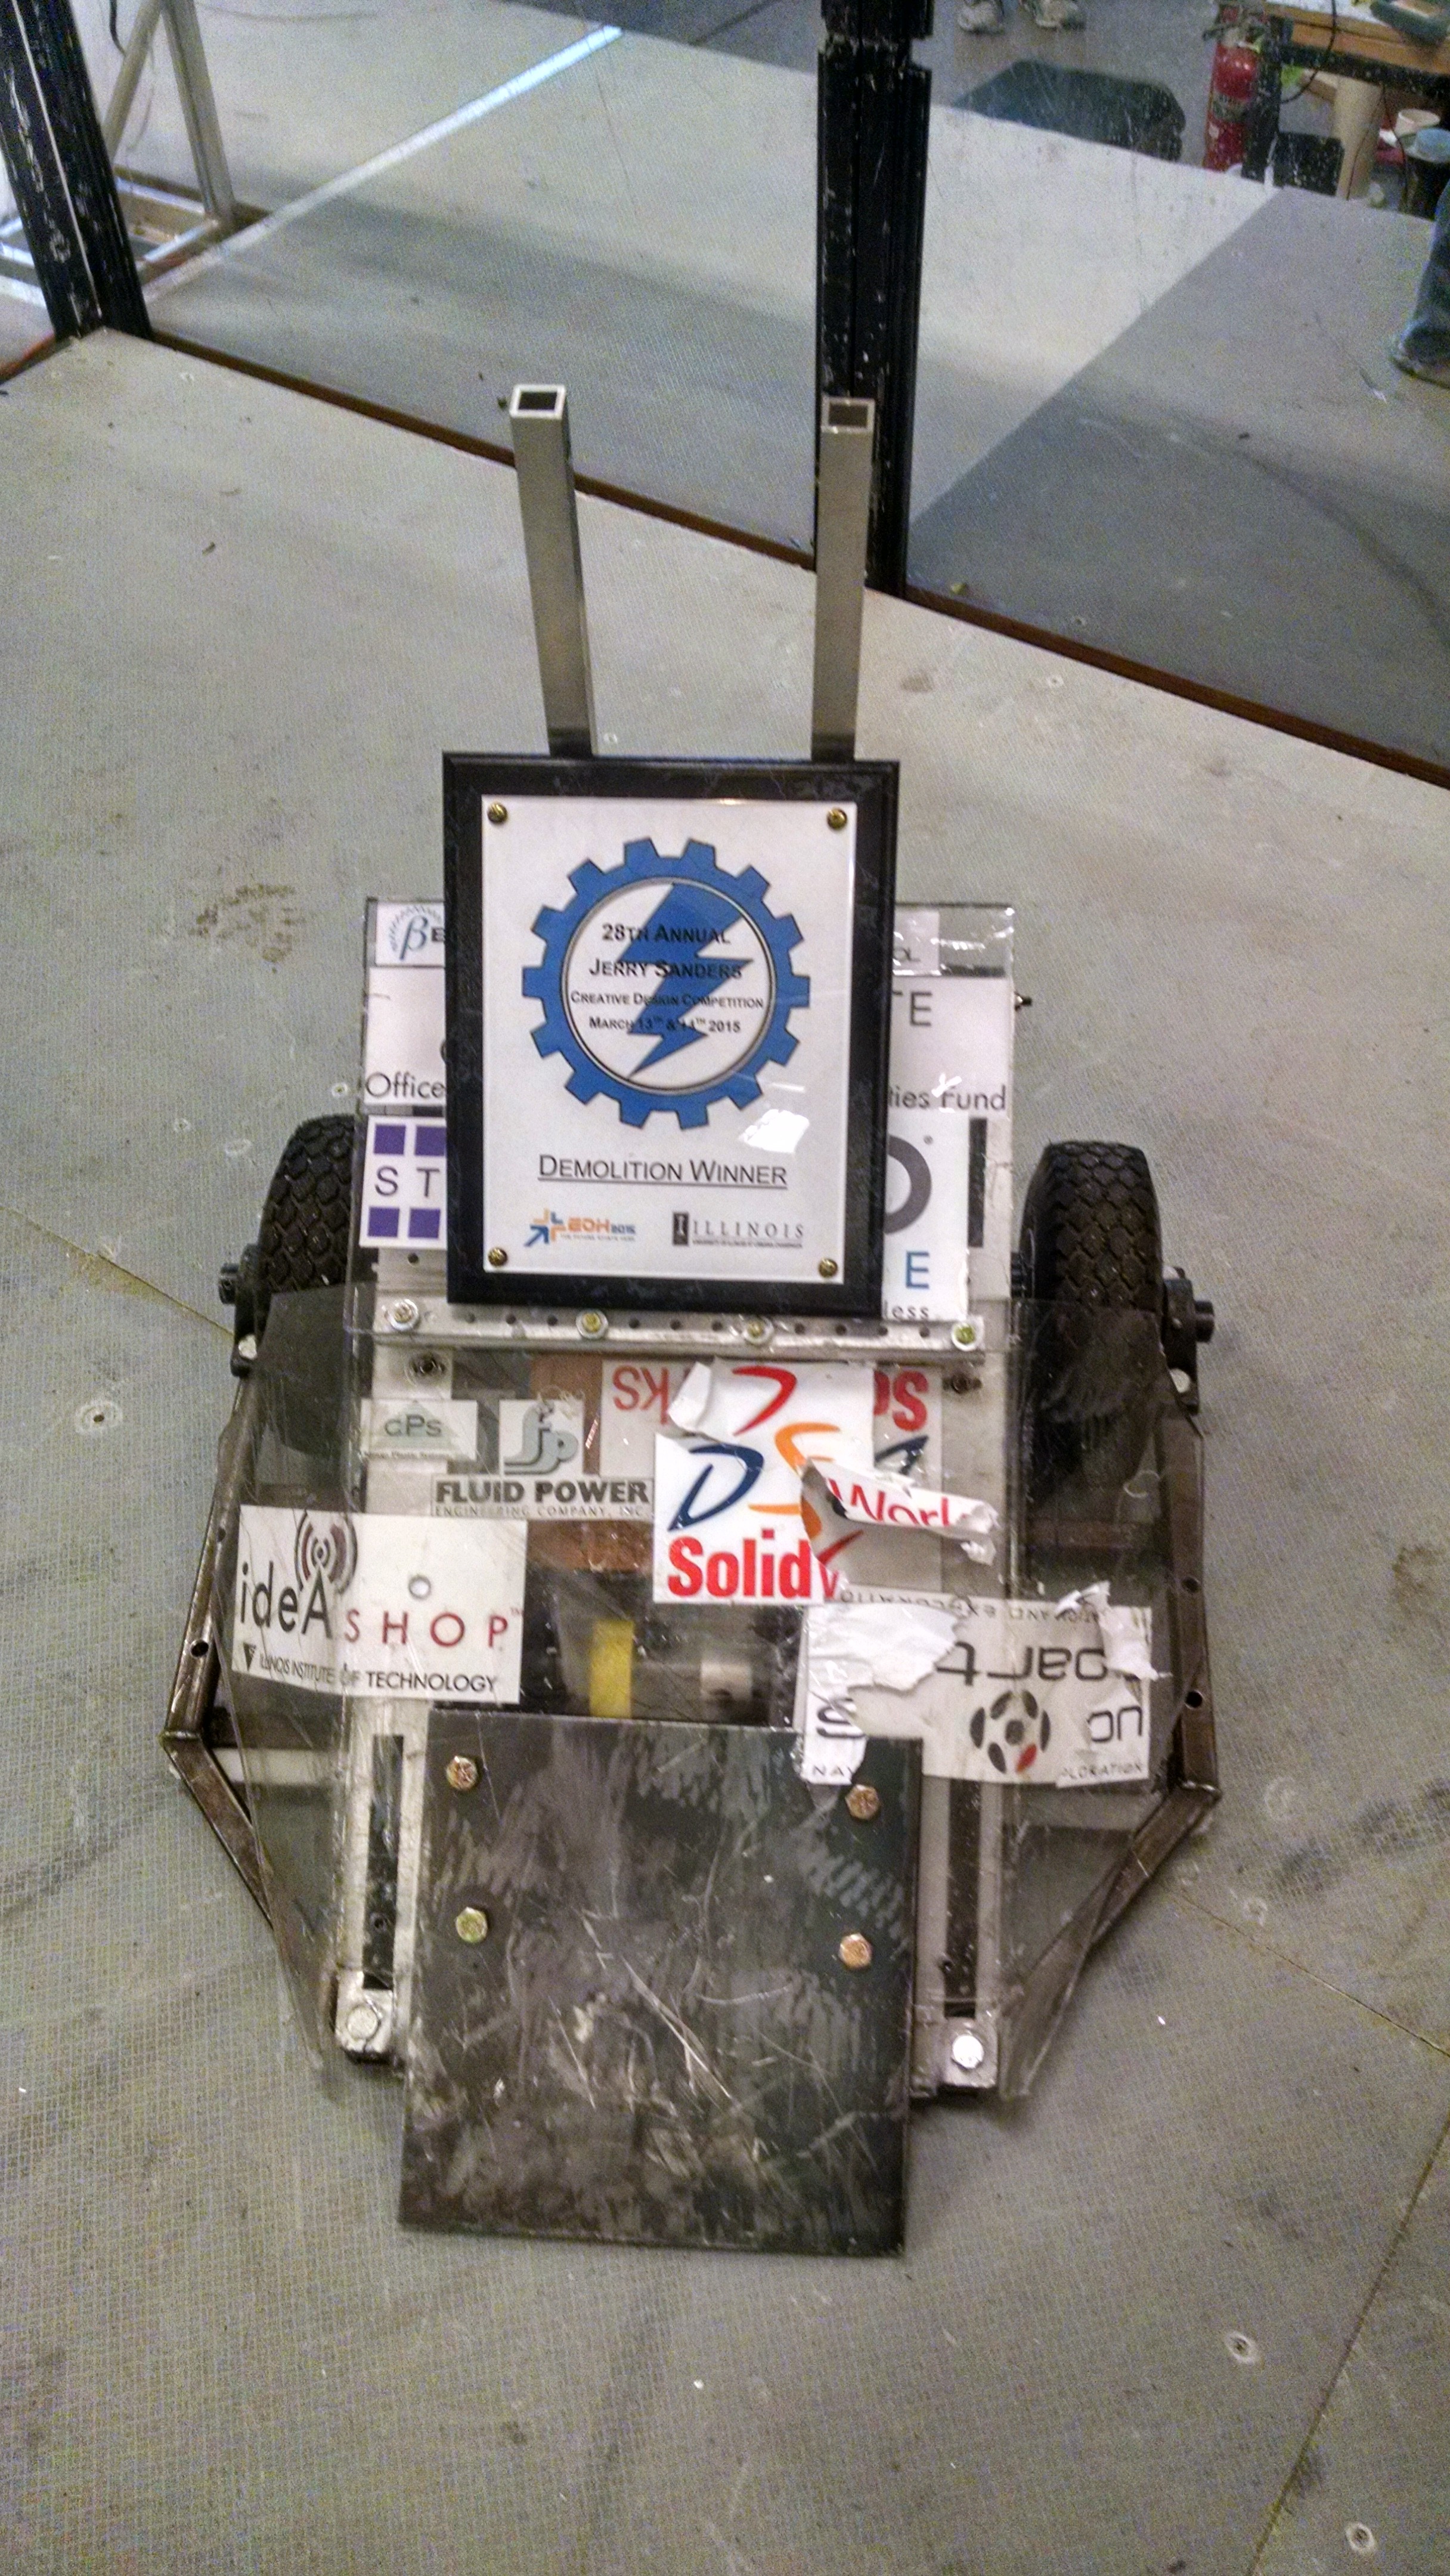
We added a great mechanical engineer to the team, and his contributions shone through on the sloped armor
ITR Lab Door Monitoring
Lab door monitoring was the first project I built at ITR. Before I came to IIT, some members of the robotics team had installed a sensor on the front door to display if the lab was open or closed on the website. They had used a limit switch off a FRC kit to sense the position of the door, but that design was plagued with problems. Limit switches are great if you have solid mounting points on a robot, but they were just hot gluing the switch to the door, so it was always either misaligned or falling off.
My replacement was extremely simple: a pad of tinfoil on the door jam, and a wire on the door itself. It has lasted for all four years without incident, and remains up and working at the ITR lab status page.

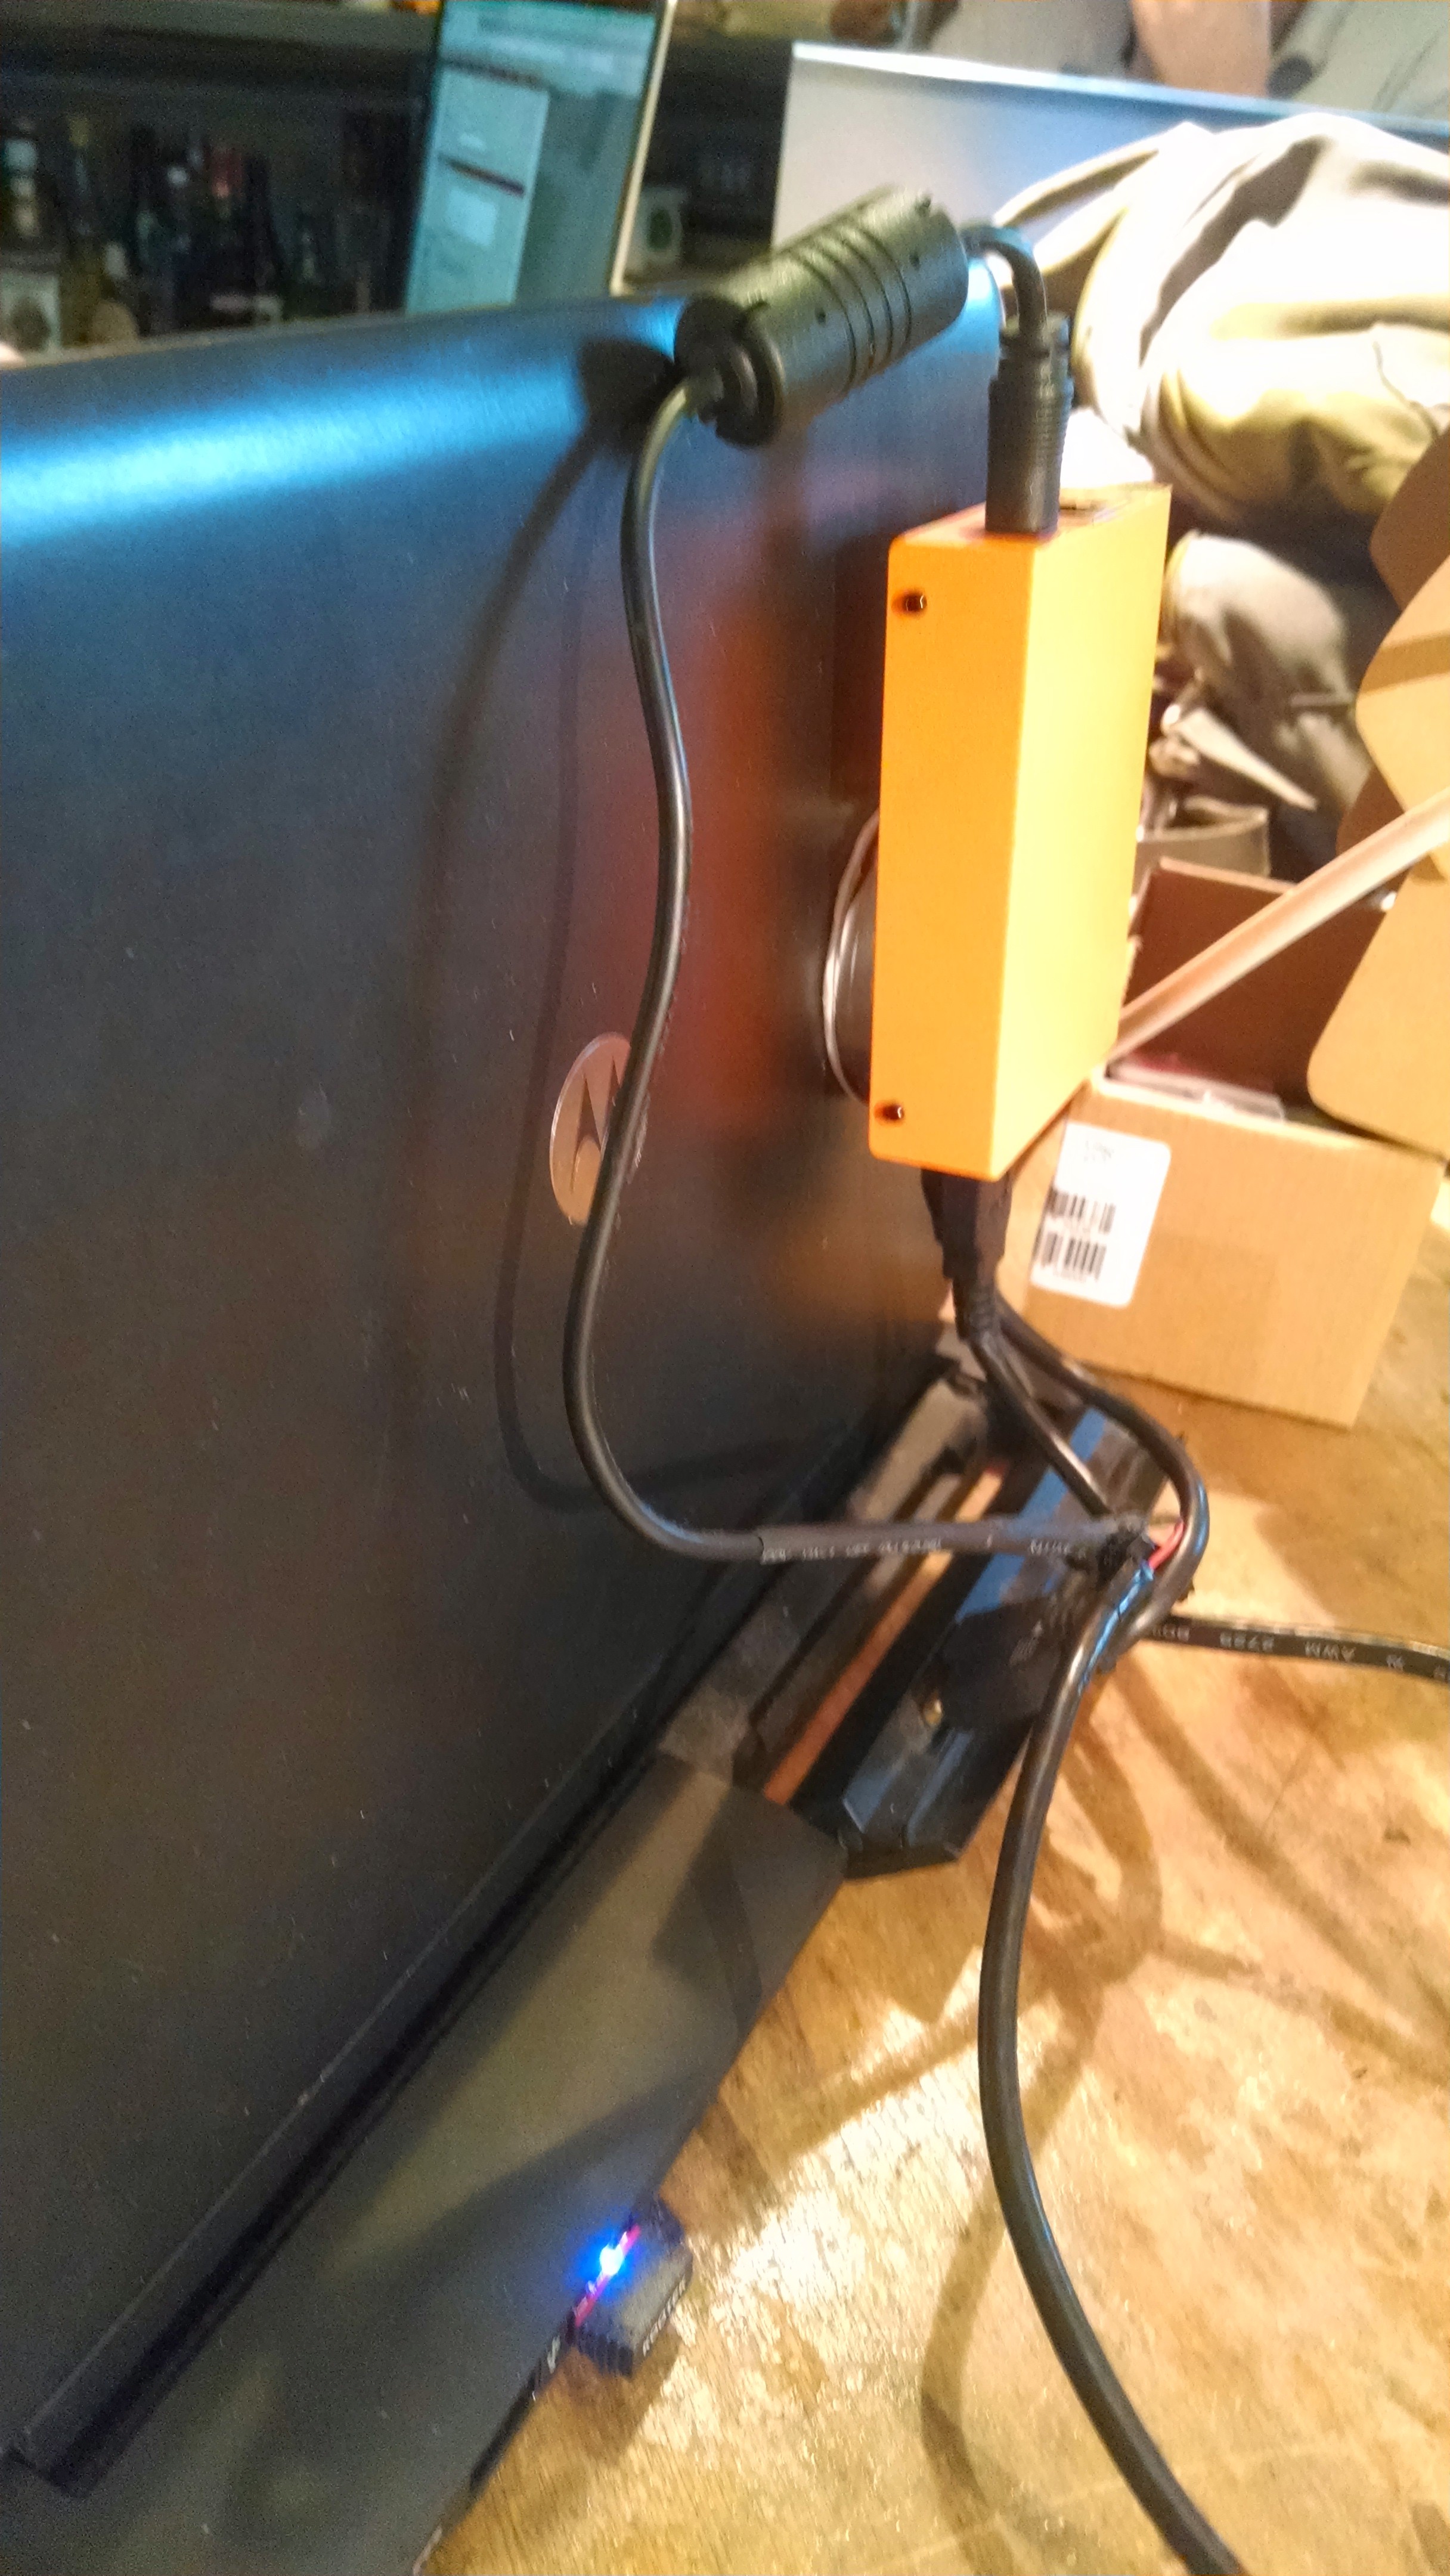
The upstairs door sensor
There is also a downstairs blast door of the lab, but it's a sliding door. That door has a similar pad of tinfoil, but instead of it being on the door and the door jam, closing the door grounds the pad. The grounding of the pad signals to an Arduino, which is connected to the server through an Ethernet shield (I bought the shield before Freshman year when I didn't know better). Code for the downstairs Arudino sketch can be found at GitHub.
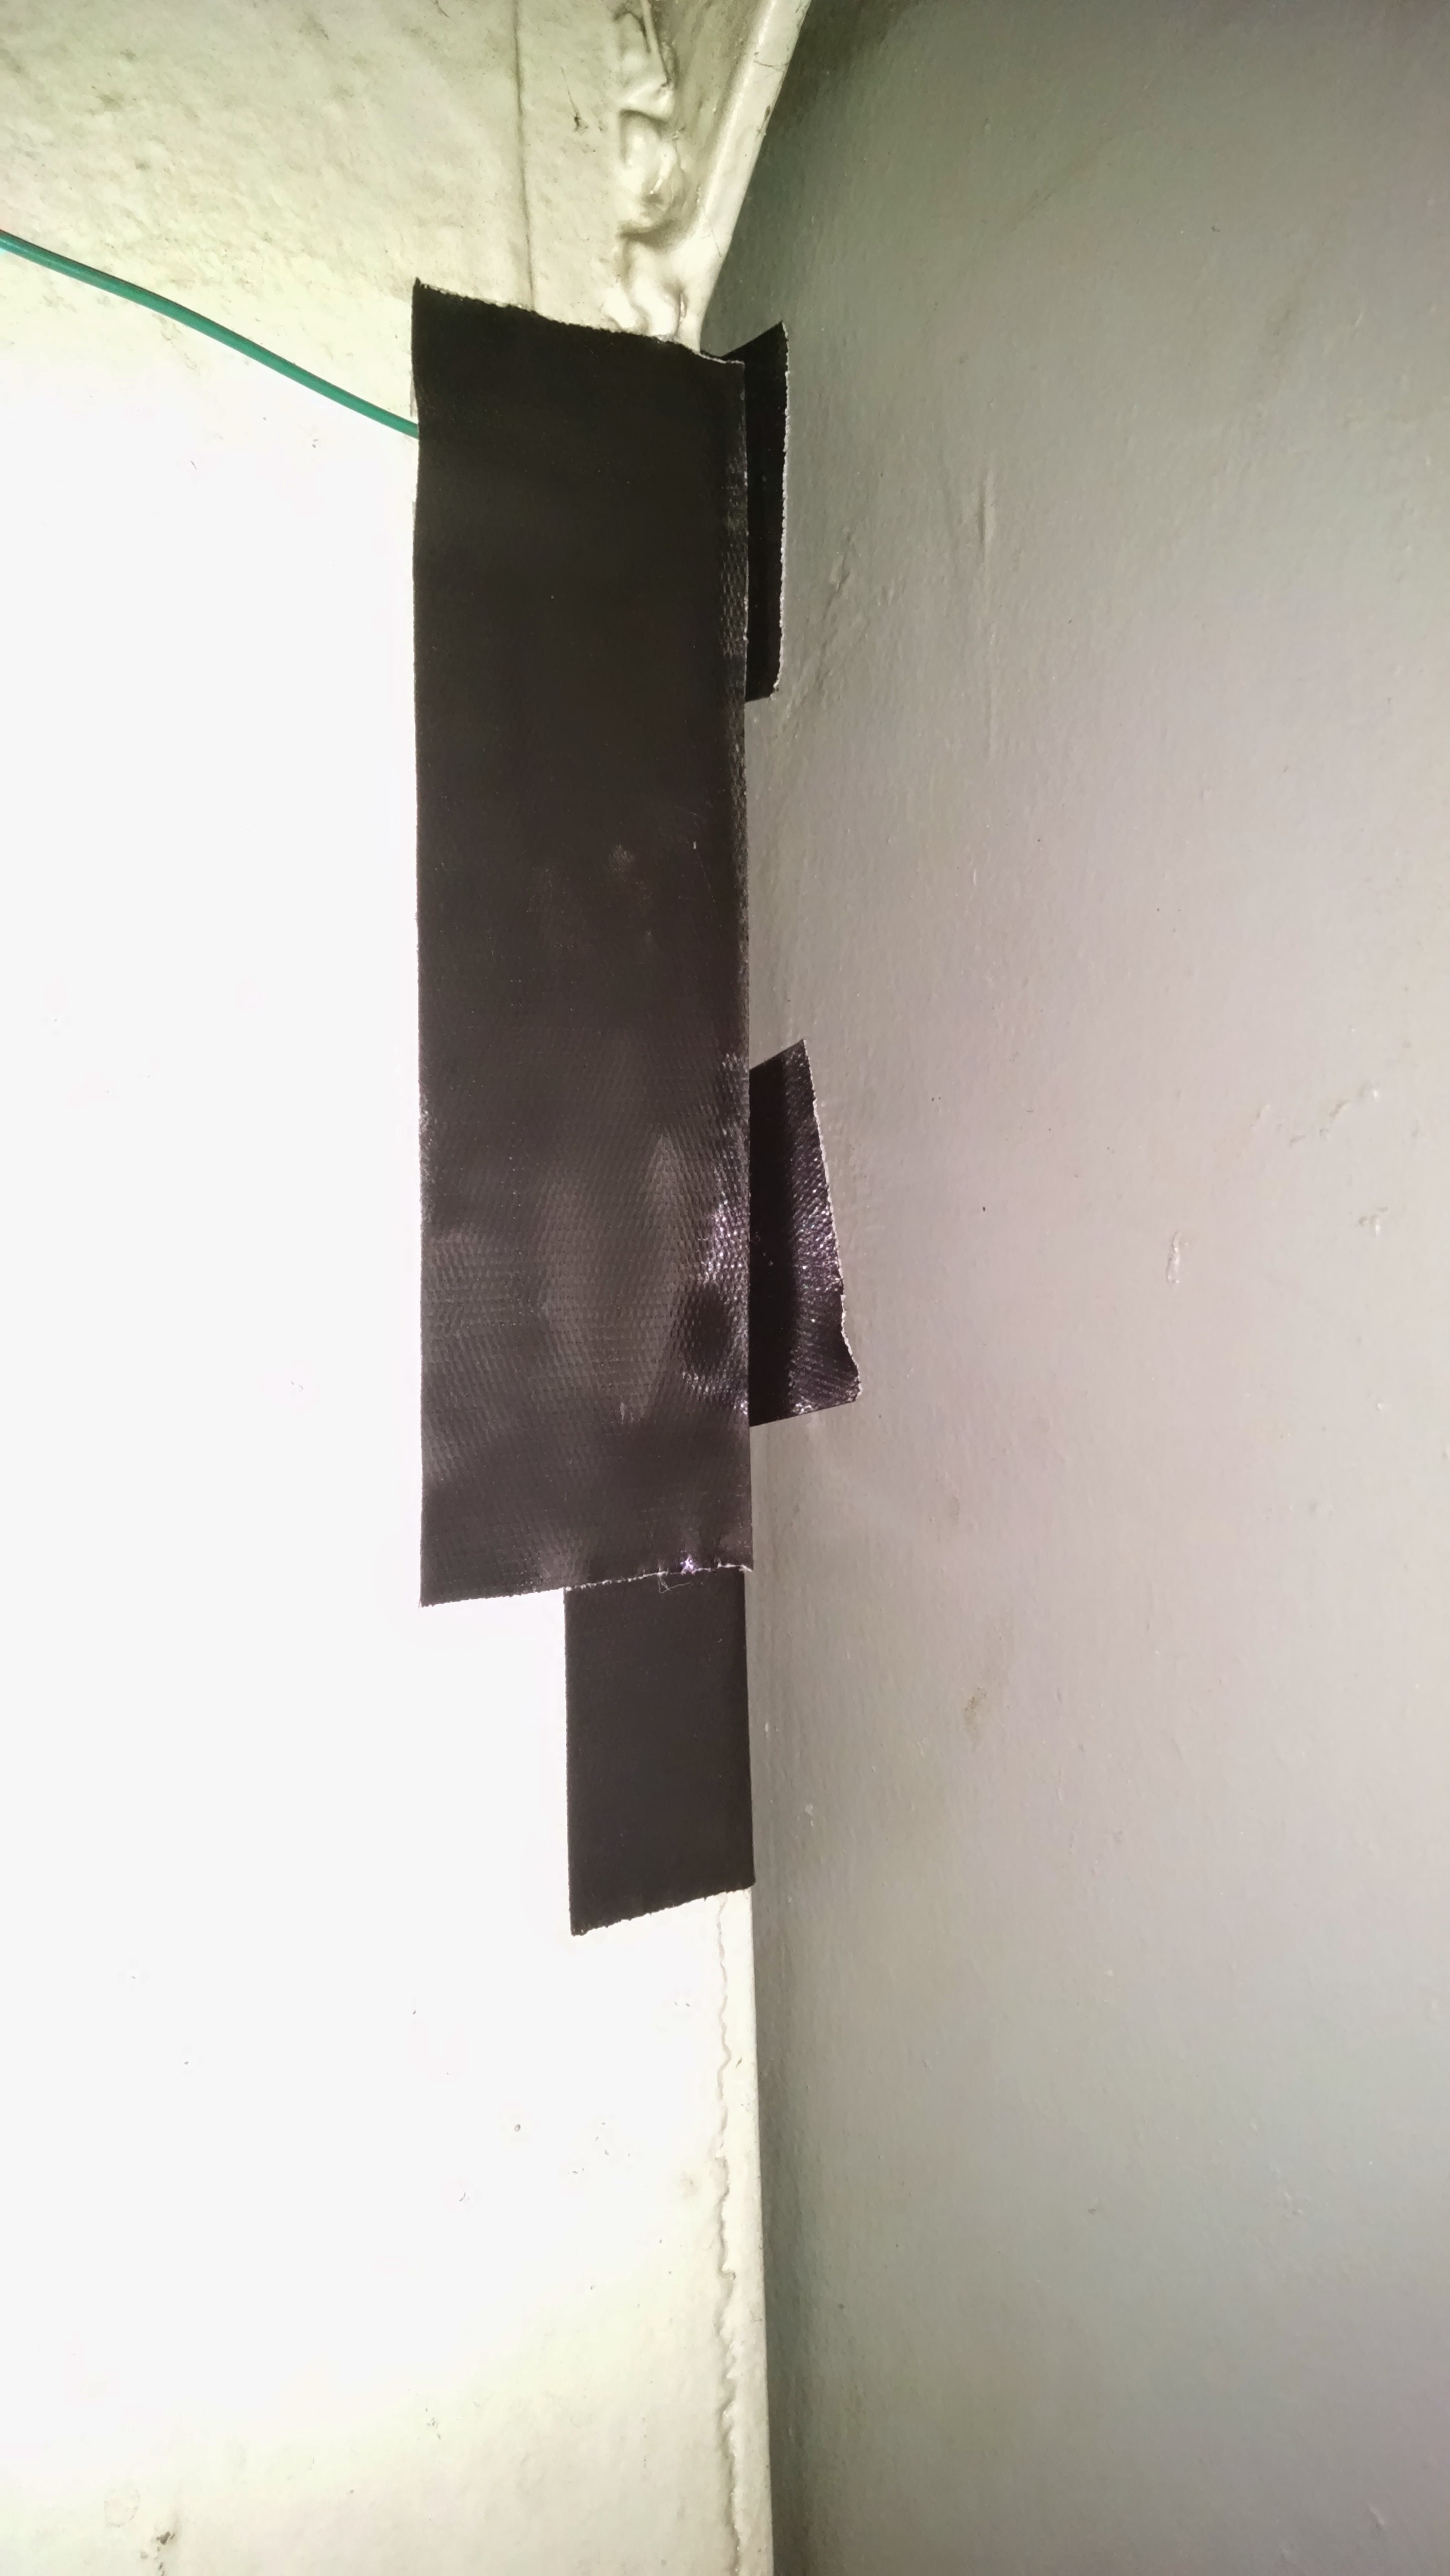
The downstairs door sensor pads

The downstairs door control box.
The front door sensor was my first contribution to the robotics lab, and I wanted a project that showed off what I had learned freshman to senior year. See, the problem is that the door sensor is useful in telling you if anyone is in the lab at any given time, but it is not good at telling you who is in the lab. That problem is harder. How do you identify each person easily and quickly? IIT issues RFID cards to students. Being a forward minded place, IIT was an early adopter of the technology, so they rolled out ID cards before the technology offered encryption. IIT ID cards are 125 kHz 'prox' style cards that can be decoded with any reader on the frequency. I bought a used one off eBay for $15, wrote a quick Arudino sketch to print out the card number over serial, then wrote a Python application to sign people in and out. My user documentation for the system is here [PDF]. The people in the lab can be found at the incredibly simple page I made. (Web design is not my top skill). The pictures are stored in Redis, along with a name and a in-lab/out-of-lab status. Seeing how I'm much more comfortable with Unix commands than I am with complicated web frameworks, the page is statically generated every minute on a cron job. Perfect for a one-off, light utilization system. The laptop is on an internal WiFi network, behind a NAT, while the server is on a IIT public IP address, so the laptop connects to the server's Redis instance over an stunnel.
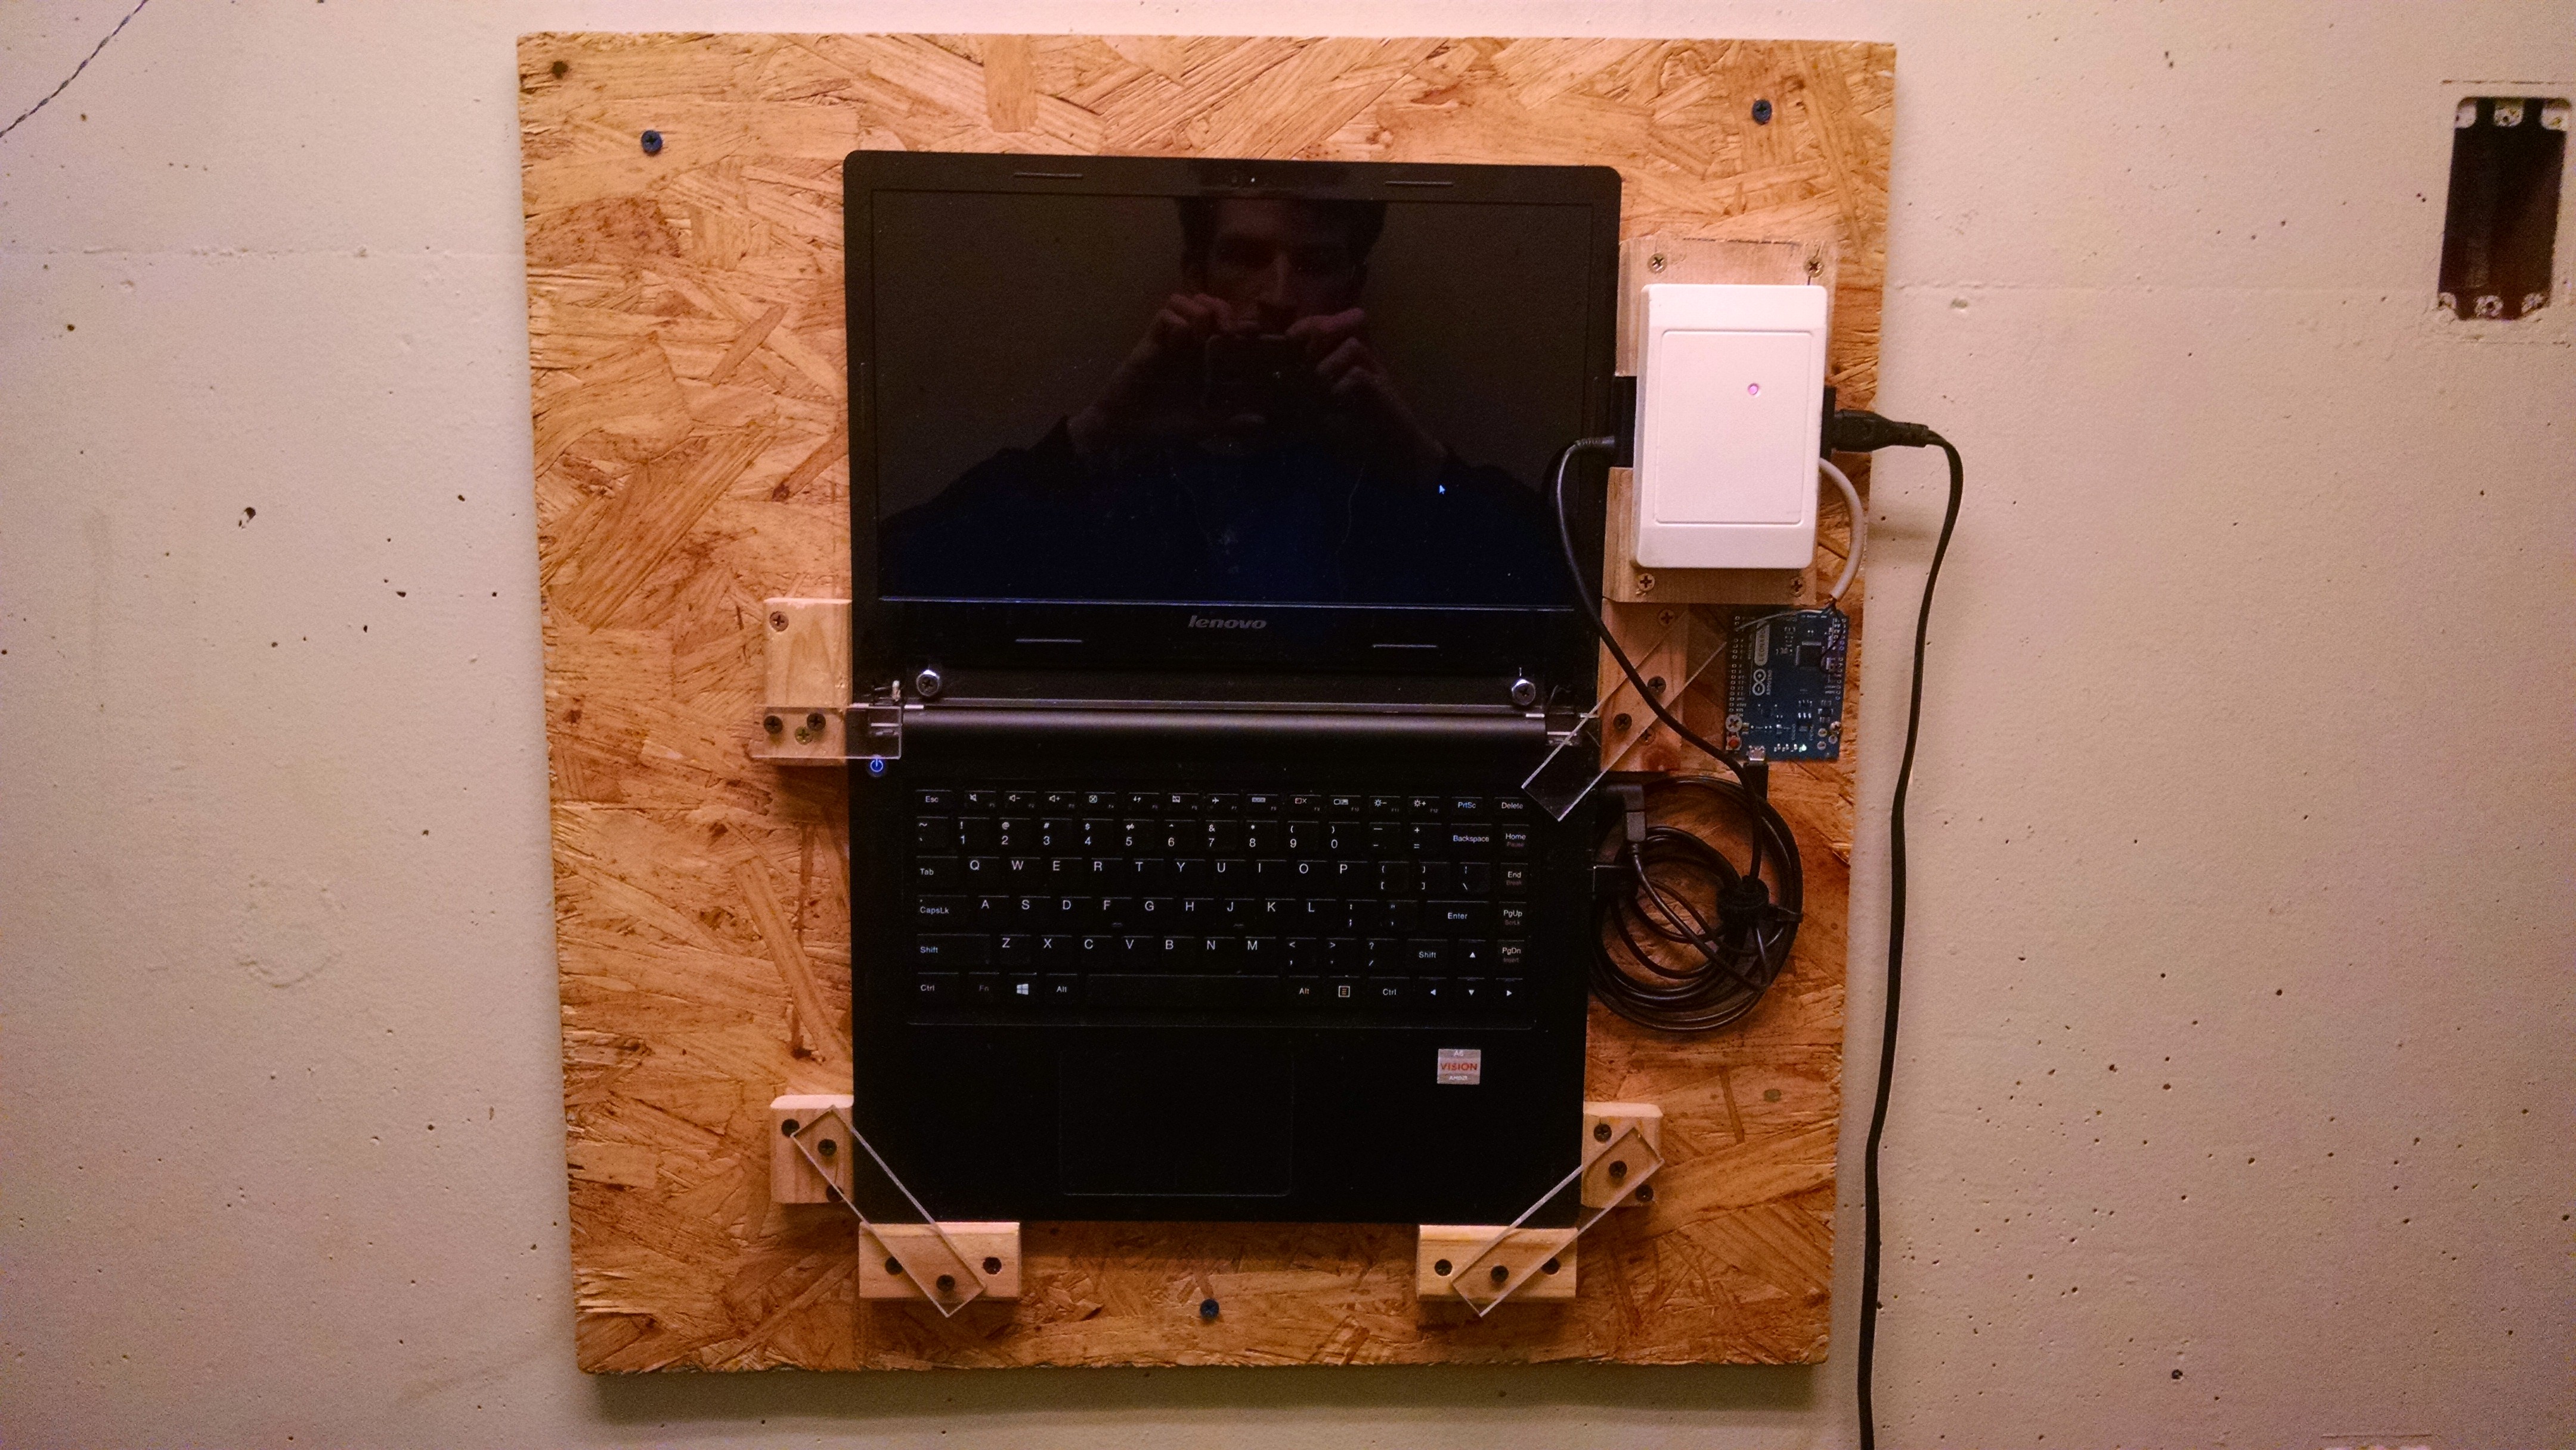
Wall Mounted RFID reader read out into a laptop
Arc Reactor
We take great pride in the robotics lab being self-sufficient. When all the flood-lamps began burning out our first thought wasn't to ask Faculties to replace them, it was to replace them ourselves. Being technical folks, we wanted to have LED lighting instead of high wattage incandescent. Digikey sells some really high power LED arrays, so we grabbed some of those and wired them off computer power supplies. Now we have motion activated lighting!
The LED arrays are insanely bright. Their power requirements aren't that bad, only 140 Watts. I had an idea to weaponize them. If you strapped on to your chest, and put a controller in your hand, you could flash blind people temporarily.
An initial test of the LED
Microsoft sponsored a hackathon on campus, for which you were supposed to use C# to build Windows Phone apps, but I emailed the organizers and they were totally fine with me programming on Linux, for open hardware, in C. So, I built the weaponized LED array, which I called the "Arc Reactor" after the chest gadget from Iron Man.
There are three sections of the Arc Reactor design: the LED + Heatsink, the Power section, and the controller.
LED: I had two possibilities for LED selection: a smaller unit that would draw about 70 Watts and a monster array drawing 140. Both of the arrays were powerful enough to require a heatsink, and they had ratings for maximum thermal resistance. Unfortunately, cheap CPU heatsinks don't come with datasheets, so I had to buy a (way too expensive) heatsink from Digikey. The heatsink is basically a quarter inch of copper with fins. I machined mounting holes for the LED, then used Arctic Silver CPU thermal compound as the thermal interface material.
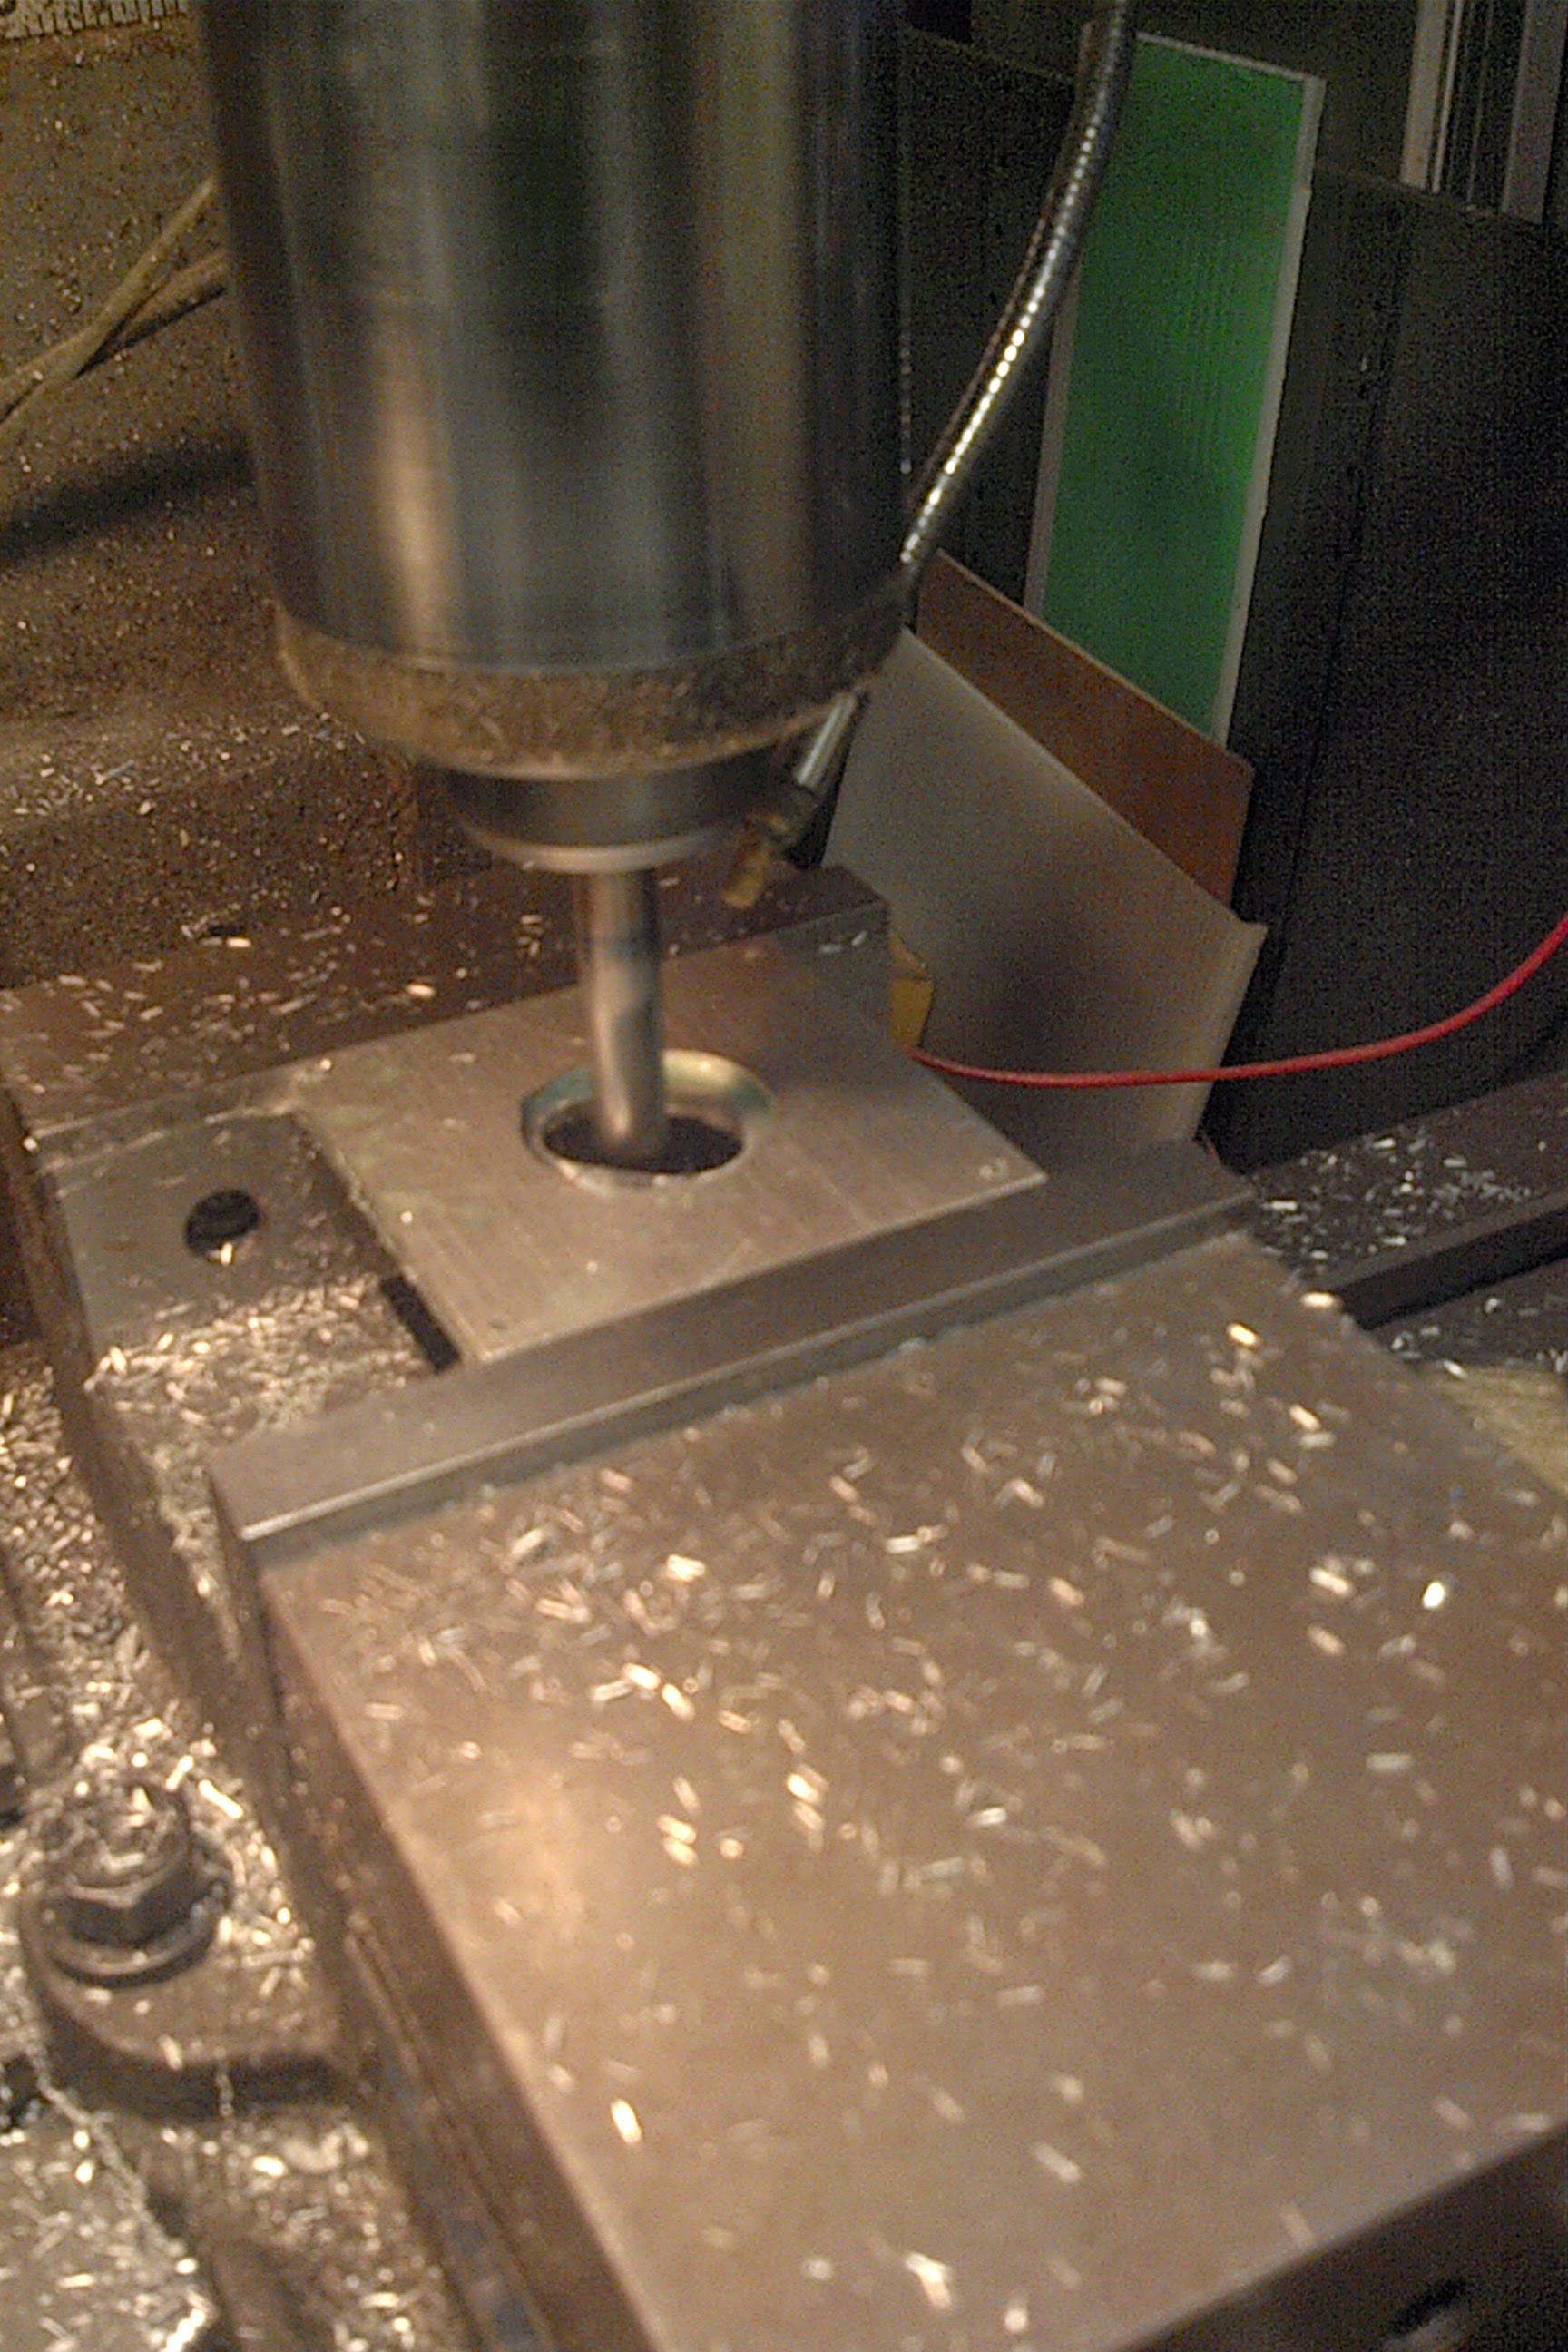
Milling the LED mounting plate
Power Components: The Arc Reactor is fed from a 3 cell 'B' grade LiPo battery from Hobby King. Back of the envelope math puts runtime at something like 3 hours continuous. The LED runs at ~50 V however, so a boost converter is required. I found a 600 Watt DC-DC boost converter on banggood.com for only $20, and I was skeptical about the quality or legitimacy of the site, but I got my boost converter and it works. I don't have a charge controller, or even a low voltage cutout for the LiPo, instead I have a 2 wire voltmeter readout to monitor the remaining charge on the battery.
Controller: The LED is strapped to my chest, and the power components to my belt, but the controller is on my arm. The LED is switched by a MOSFET, which is controlled by a Teensy 3.1 reading from an accelerometer. If the magnitude of acceleration crosses a threshold, the light flashes.
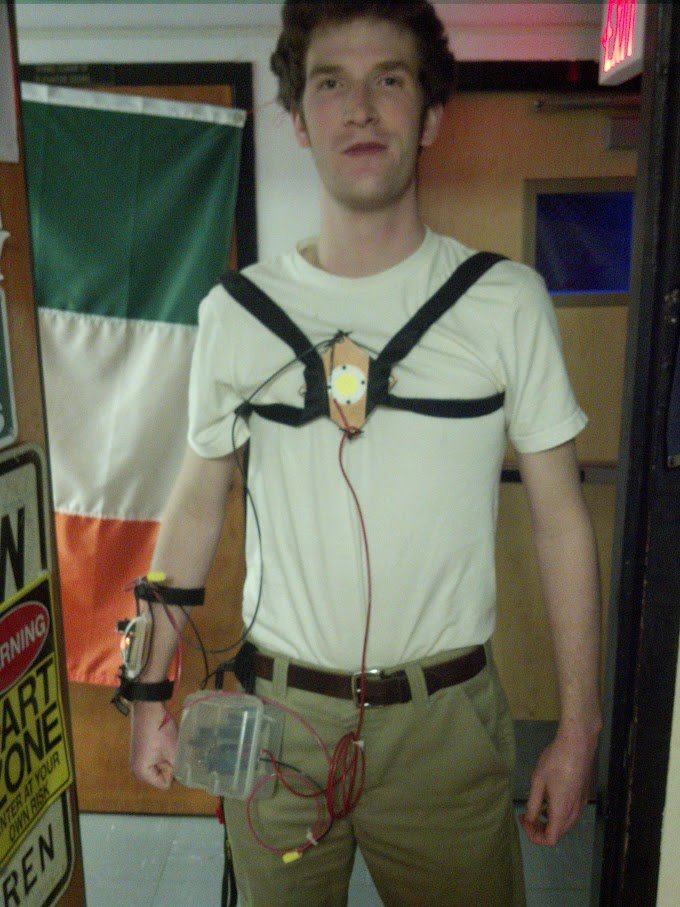
The Arc Reactor the day after it was built
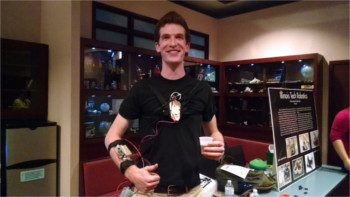
The Arc Reactor at the Adler Planetariumfor their Hops 'n' Bots event
Third Deck Alarm
During my Junior year, I joined a fraternity on campus, ΦΚΣ, or the "Skulls." Like many fraternities, we have some traditions and historic rivalries. One of those is the eternal war between the glorious armies of Third Deck, and the lowly peasants of Second Deck. The floors of the fraternity house are internally referred to as "decks," supposedly because of Navy ex-servicemen's influence in the years after WWII. There are two residential floor of the fraternity, the second, and the third. The members of the (superior) Third Deck, feel that their floor is "best deck" and often wish to remove Second Deck intruders from the deck.
The Third Deckers are rallied by the Third Deck alarm. When I moved in during my pledge semester, the Third Deck Alarm was an MP3 of a submarine's dive horn. The guy at the end of the hall would switch on his extra set of speakers and blare the siren down the hall. There were two main problems with the MP3 + speaker based third deck alarm: volume and control. Speakers can only get so loud, and they might not be effective through closed doors. Also, the only person who could sound the alarm was the guy at the end of the hall. What if intrusions happened while he was out? We would be defenseless!
An improvement was engineered.
The new design used a 'Wolo Model 330 Oooga Sound Fun 12 Volt Horn' found on Amazon. It has an output of 114 dB. For reference, here's Wikipedia's table of sound pressure to real life examples. Power for the horn is switched with a MOSFET, which is in turn controlled by an Arduino Pro Mini. The Arduino is connected to a Raspberry Pi via a 434 MHz, 300 Baud serial RX-TX pair.

Wolo Model 330 Oooga Sound Fun 12 Volt Horn
Yes, that's the actual name
The connection is one way, from the Pi to the Arudino, and really only needs to transit one bit of information: turn on the alarm. There is some problem with noise on the receiver, so I am using a super simple yet robust modulation: transmit 'U' = 0x55 = 0101 0101.
The horn is a simple design, but to complete the hack, I made it untouchable. 114 dB's is excessively loud. It is still super loud from behind a door. On the deck, there is a closet with the ladder to the roof. This closet is always kept locked to prevent people from getting on, then falling off, the roof. Inside that room is the perfect place for the alarm. The only problem is that the closet has no outlets! So, I did the responsible thing, cut an extension cord in half, stripped the conductors and wired into the power that used to run to the telephone switchbox. Oh, and they wouldn't let me throw the breaker, so I wired into live wires.
Fortunately, I didn't electrocute myself, so now in the closet is the horn, an Arduino, a lead-acid battery and its charger, plugged into half an extension cord wired into the wall. The battery means that you cannot disable the alarm even if you throw the breaker to the deck. Third Deckers are forever protected!
Subwoofer Cabinet
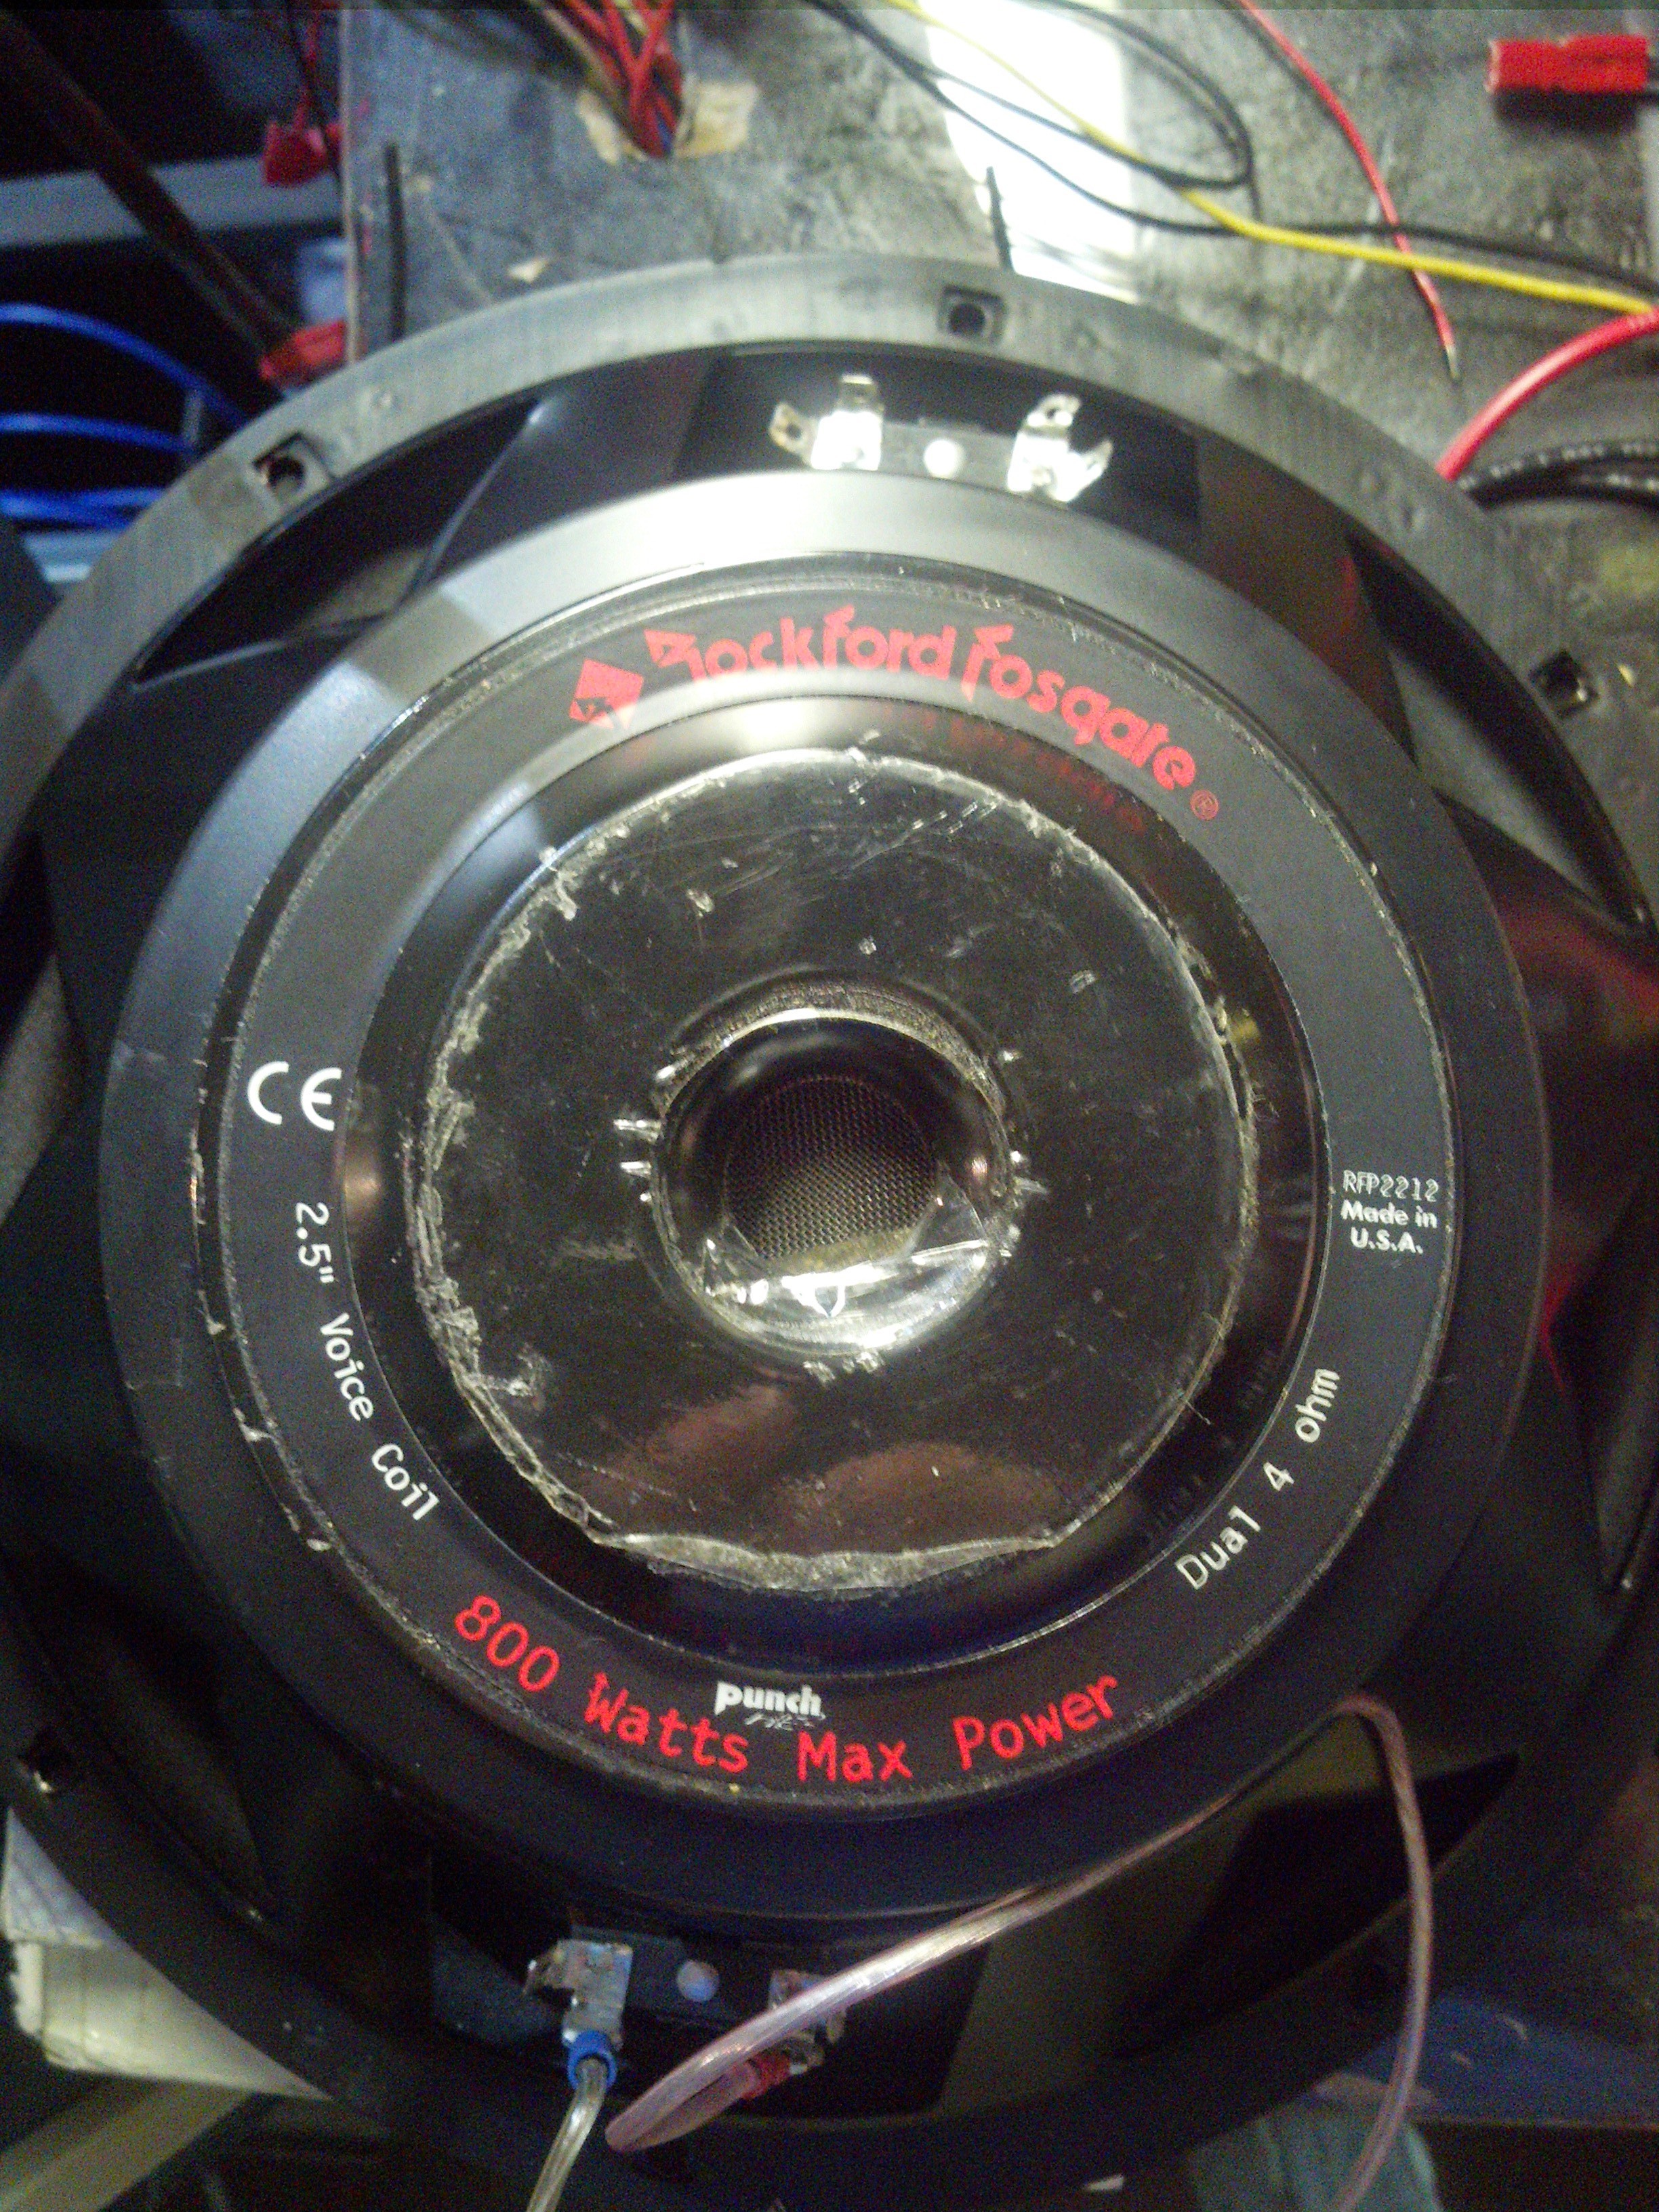
The first major purchase I made with money I earned was a pair of Polk Audio RTi4 Bookshelf speakers in cherry veneer. Then at the start of my freshman year, I saw a sale on a matching cherry 10' Polk subwoofer on Amazon, so I bought that too. When I got into the Fraternity house, I bought a second subwoofer, which ignited my love of heavy bass music. Knowing that I love bass, one of the graduating brothers took me aside and showed me two 12" 400W subs he pulled out of his brother's car. Suddenly I had 1kW of subwoofer in my possession!
One of the woofers sitting on my desk in the robotics lab
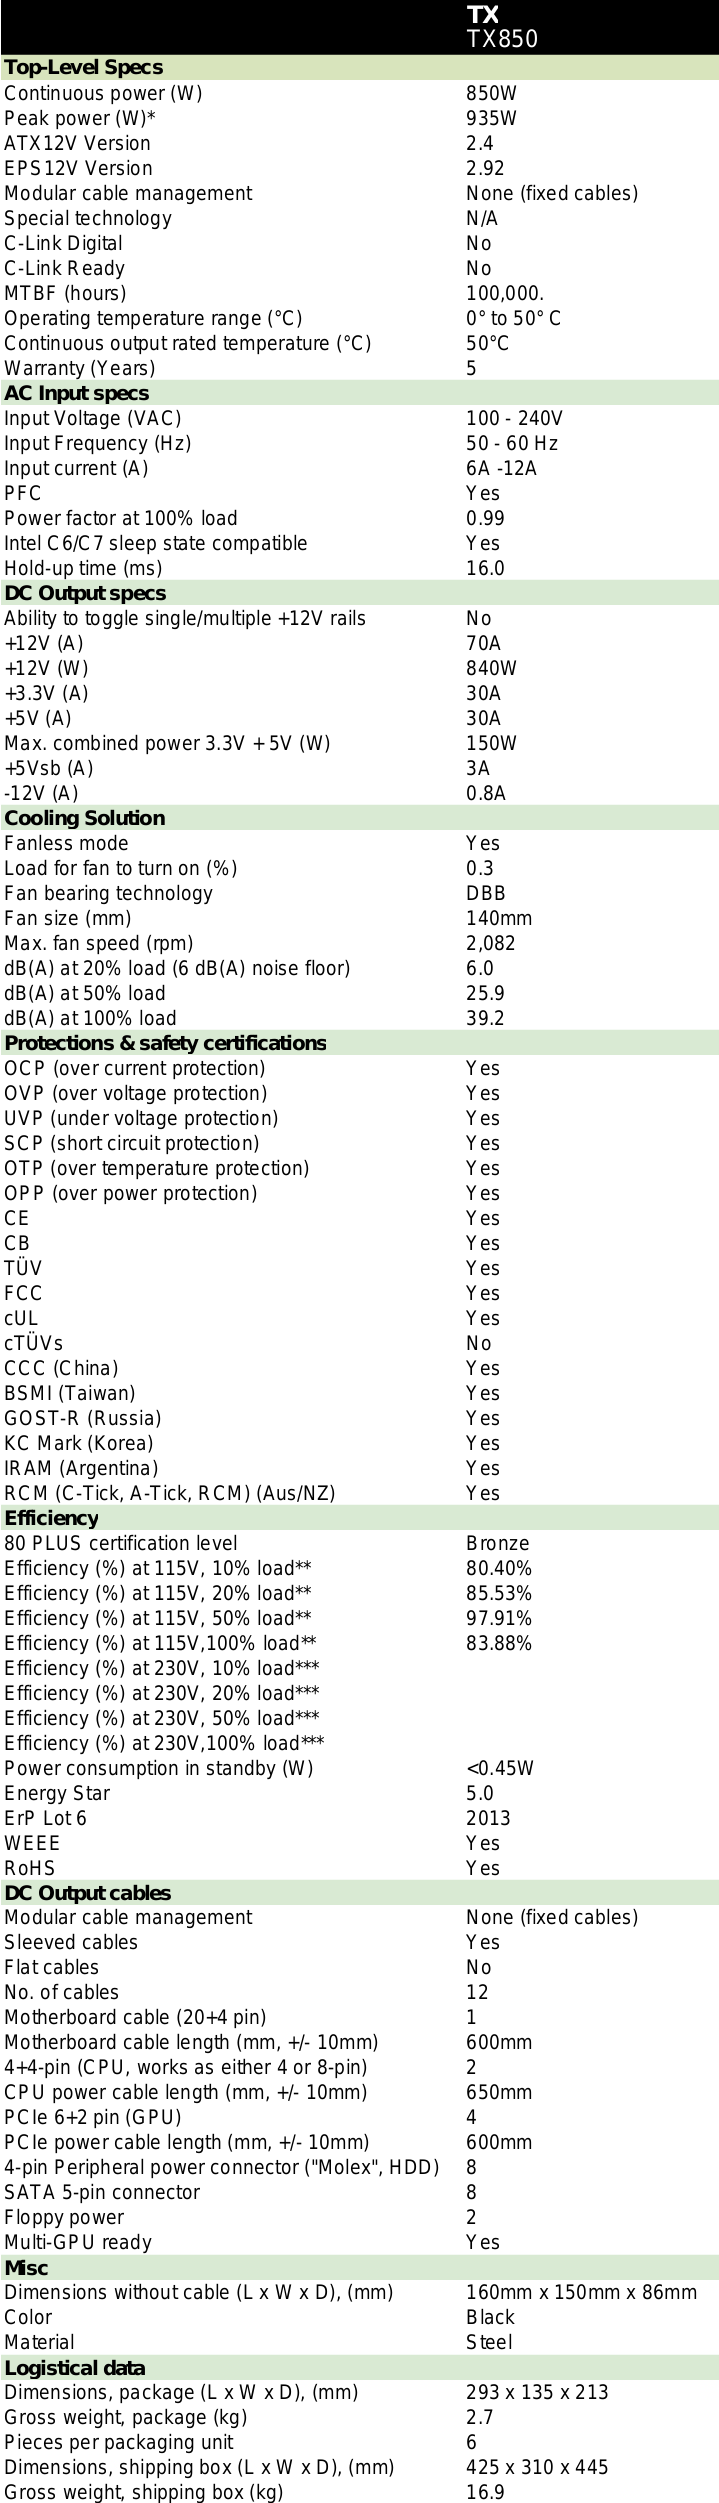
Along with the cones, the brother also sold me an amplifier, but I had no way to power the system, and no cabinet for the subs. There is one obvious choice when you need a lot of low ripple power at 12v: a computer power supply! I used a Corsair TX850, which has a full load efficiency of 83.88% (yeah, it actually has a datasheet!) and rated continuous power of 850 Watts, which means that I'm pulling about 1kW from the wall at full load.
1kW is enough to dim the lights in the room as the bass kicks, so I decided to put in a 2 Farad capacitor on the 12v rails (this is a surprisingly common addition to car audio it seems, the cap was way cheaper than I thought a massive capacitor would be). Unfortunately, it looks like few other bass music enthusiasts care about datasheets for their boomer caps, so I have no real engineering data on the capacitor. From observing the time it takes to reach 5RC, it seems like the capacitance is a bit below rating. In any event, you can't just wire in a 2F cap to the output of the supply, flip on the supply and expect any of your equipment not to make magic smoke.
The real engineering of the project came in designing a capacitor charge circuit. The design is pretty simple, a power resistor in parallel with a bank of MOSFETS, but it was very custom fabrication. I didn't want to wait for shipping on a power resistor, so I wound one out of some nickel-chromium alloy wire we had in the robotics lab, then slid the windings into a Pyrex test tube that I had ground the end off. It's effective, but it looks exactly like something you'd see on a mad scientist's table. To finish it all off, I have an awesome double switch panel, one to start the power supply, and one to bypass the power resistor. So far I haven't switched the order and blown up the FETs.
To make an a cabinet for the subs, I used the Idea Shop on campus, which is like a university run hackerspace except with more rules. They CNC routed some 3/4" MDF for the enclosure. Lucky for me, the datasheet on the subs had specific dimensions for a cabinet, so I didn't have to do any acoustic design work.
Software (Only)
Music Muter
As you might imagine, 800 Watts of Bass can be heard (felt) for quite a distance in the house. Beyond that, the Computer Engineering/Computer Science hybrid that I've become gives me a pretty shifted sleep schedule, so I like to boom my subs from about 10pm on. Other people in the house are less happy about boomy bass, so they might want to make the bass go away.
I'm an Engineer, I can solve problems with technology! First I set up a email scraper on a cron job every minute to watch for any email to music@chinetti.me with the first four letters of the subject 'MUTE' then mute first ALSA volume control (which is either master or the Pulseaudio master). That revision of the code is up at GitHub.
Eventually I realized that email was dumb, and slow, and why wasn't I just using a webpage. So I set up lighttpd on my desktop and now you can just go to silver.chinetti.me to mute it via a smaller CGI script.
mt7601 Patch for Arch Linux ARM
I spent the summers after my Sophomore and Junior years in NYC working for Goldman Sachs as an intern. Although NYC is full of distractions and fun stuff to do, I still have a tinkerer's urge to build stuff. There's an awesome hackerspace in Brooklyn called NYC Resistor, so I went to a bunch of their open houses just to be around hackers and builders. At the NYCR, they have a vending machine that sells Beaglebone Blacks. In the summer of 2014 BBB's were out of stock everywhere, and undergoing a price hike, so I jumped on the chance to buy one there.
I've been running Linux on my machines since my Sophomore year of high school, and Arch Linux since Junior year of college. There's a port of Arch for ARM that I installed on my BBB. A friend from school had a recommendation for a case from Logic Supply, so I picked up a USB WiFi module there as well.
Now, you'd think that if you specifically sold a WiFi adapter for a BeagleBone, it'd have working drivers. Well, this one's vendor supplied modules are broken on newer kernels. Fortunately, I had spent the summer working on a big C++ project, so I wasn't as scared of a big unknown codebase. Diving through the compilation errors, it turned out that the only problem was that a struct had been renamed. Pretty simple fix. The module compiles and works now, and I fixed the PKGBUILD and submitted my first pull request on GitHub! I have commits in a open source project! look!
The front of my Beagle Bone Black laptop

The back of my Beagle Bone Black laptop